


So you want to be a SOC Analyst? Part 1
Set up a small virtualization environment (2 small VMs)

If you just landed here, be sure to check out the Intro to this series for backstory.
NOTE:
This guide is recommended for a system with at least 8GB of RAM, best case 16GB+.
Keep an eye on your system’s disk space as we’re potentially about to consume ~80-100GB of it.
Many of the commands provided expect you are using the exact systems I prescribed. If you decide to use different systems (like your own Windows VM, etc) then you’ll need to tweak those commands accordingly.
Unfortunately, I cannot support issues that go beyond the instructions here. If you come up against a problem I haven’t described, you’ll need to polish up those Google-Fu skills. If you get hopelessly stuck on a particular set of steps, consider starting fresh with a new VM or using snapshots to revert to known good states.
It is highly recommended to follow this guide in order, if you hop around you may have issues.
Set up your virtual environment
Download and install VMware Workstation Pro.
UPDATE: This process has changed significantly due to the recent acquisition of VMware by Broadcom. The good news is, VMware Workstation Pro is now free for personal use. The bad news is, you have to create an account with Broadcom to access the download links and it’s a bit of a process.
Follow this guide to gain access to VMware Workstation Pro through Broadcom’s maze of pain.
Download and deploy a free Windows VM directly from Microsoft.
Get the “VMWare” version of the workstation.
Take notice of the “Expiration date” of your VM, it will stop working after this date, but you can always download a new one.
Once downloaded, unzip the VM and double-click the
WinDev####Eval.ovffile to import the VM into VMware, but do not start it up yet.Once imported, if you have 16GB or less of RAM on your system, you may want to modify the amount of RAM allocated to the Windows system — it has 8GB by default but can run with 4GB. If the VMs run slow, it may be due to not enough free RAM on your host.
Download and install Ubuntu into a new VM
Download the Ubuntu Server 22.04.1 installer ISO.
NOTE: I am specifying the SERVER version of Ubuntu because it comes preinstalled with necessary packages. If you choose the Desktop flavor, you will have issues, and you are wasting unnecessary resources.
Once downloaded, create a new VM in Workstation with the following specs
Use the downloaded ISO as the installer image
14GB Disk size
Customize Hardware
2 CPU cores
2GB RAM
During OS install, leave defaults unless otherwise specified
Use Tab to navigate, Space to check boxes, Enter to confirm
“Installer update available”
“Continue without updating”
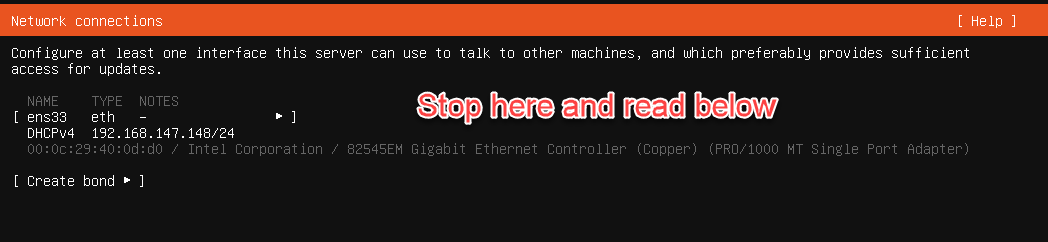
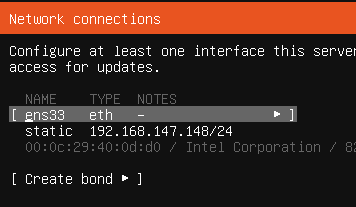
When you get to “Network connections” section above, we need to take a few steps to set a static IP address for this VM so that it doesn’t change throughout the lab or beyond it.
Find out the gateway IP of your VMware Workstation NAT network
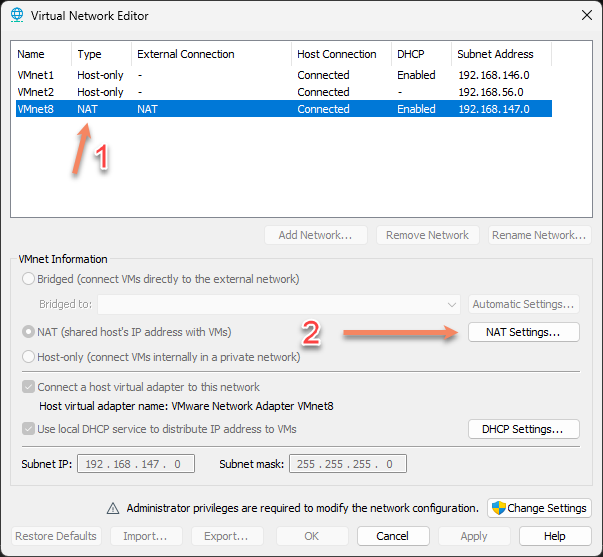
In VMware Workstation, click “Edit” menu at top
Click “Virtual Network Editor”
Select the “Type: NAT” network
Click “NAT Settings…”

Copy down the “Subnet IP” & “Gateway IP”, we’ll need it in the next step
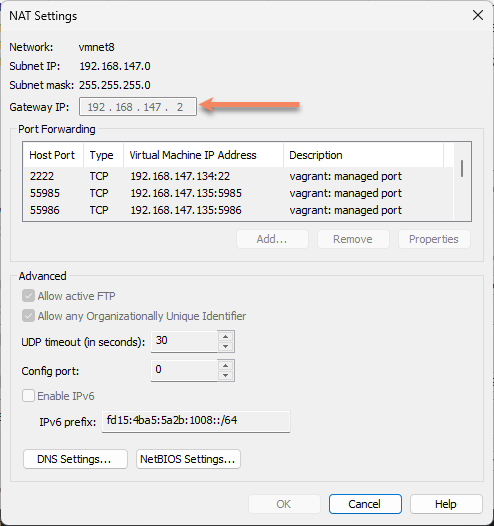
Close the NAT Settings and Virtual Network Editor windows.
Now, back in the Ubuntu installer, let’s change the interface from DHCPv4 to Manual.


Be sure to carry forward the subnet and gateway IP from the previous step V., but adding the /24 to subnet IP. The “Address” gets copied from what was previously assigned via DHCP.
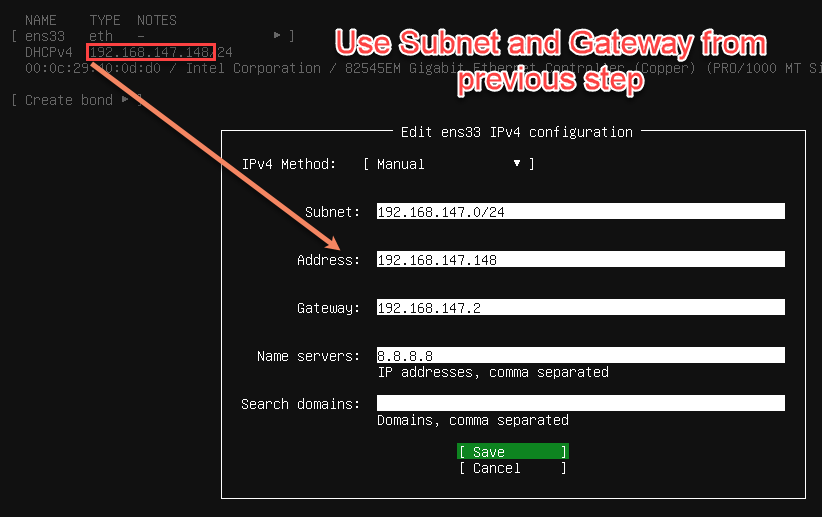
When you’re done, you should see this.

NOTE: Write down the Linux VM’s IP address because you will need it multiple times throughout this guide.
Set a memorable username/password (this is just a lab)
Your name:
userYour server’s name:
attackUsername:
userPassword:
password
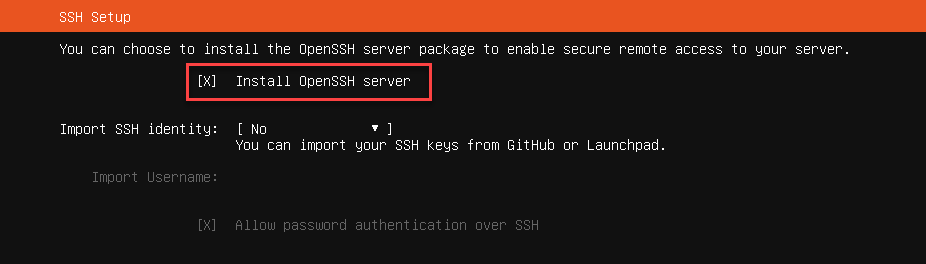
Install OpenSSH server?
[check/yes]

Continue installing OS until “Install complete!”
Hit Enter on [ Reboot Now ]
If it hangs on “removing the CDROM” just press Enter
After the reboot, let’s perform a quick connectivity check.
Logon with the credentials we defined during install
Username:
userPassword:
password
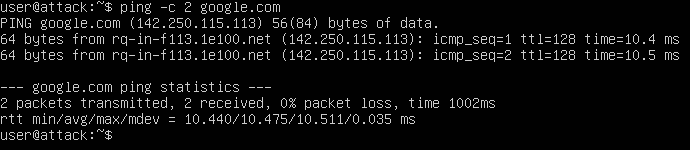
Make sure DNS and outbound pings are working
ping -c 2 google.comIf your output resembles mine, you’re good to go.


Setup your Windows VM
Go ahead and “power on” your Windows VM for the first time.
It will automatically log you in as “user”.
Wait for the desktop to appear.
Disable Defender on Windows VM
Permanently disable Microsoft Defender so it doesn’t interfere with the shady stuff we’re planning. This is trickier than it sounds (especially in Windows 11) as Defender will turn itself back on, so follow ALL of these instructions verbatim in the exact order below.
These steps are closely derived from this guide and this one as well, but with fewer screenshots. If you need more guidance, see the original guides.
Note: for an easier option, consider just using Sordum’s Defender Control (not covered in this guide, but fairly straightforward)
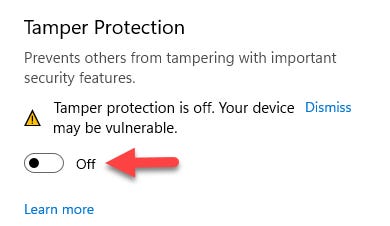
Disable Tamper Protection
Click the “Start” menu icon
Click “Settings”
Click “Privacy & security” on the left
Click “Windows Security”
Click “Virus & threat protection”
Under “Virus & threat protection settings” click “Manage settings”
Toggle OFF the “Tamper Protection” switch. When prompted, click “Yes”

While you’re in there, toggle every other option OFF as well, even though we’re about to take care of it a couple different ways.
Close the windows we just opened.
Permanently Disable Defender via Group Policy Editor
Click the “Start” menu icon
Type “cmd” into the search bar within the Start Menu
Right+Click “Command Prompt” and click “Run as administrator”
Run the following command
gpedit.msc
Inside the Local Group Policy Editor
Click Computer Configuration > Administrative Templates > Windows Components > Microsoft Defender Antivirus
Double-click “Turn off Microsoft Defender Antivirus”
Select “Enabled”
If you enable this policy setting, Microsoft Defender Antivirus does not run, and will not scan computers for malware or other potentially unwanted software.
Click Apply
Click OK
Permanently Disable Defender via Registry
From the same administrative command prompt we previously opened, copy/paste this command and press Enter
REG ADD "hklm\software\policies\microsoft\windows defender" /v DisableAntiSpyware /t REG_DWORD /d 1 /f
Prepare to boot into Safe Mode to disable all Defender services
Click the “Start” menu icon
type “msconfig” into the search bar within the Start Menu
Go to “Boot” tab and select “Boot Options”
Check the box for “Safe boot” and “Minimal”

Click Apply and OK
System will restart into Safe Mode
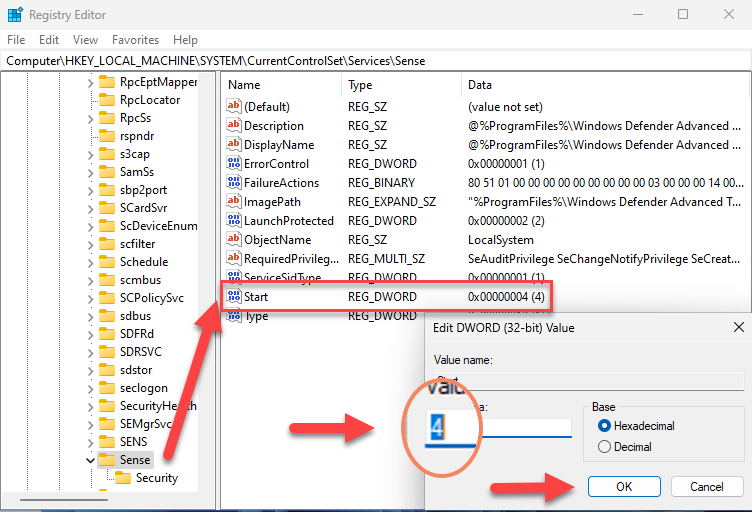
Now, in Safe Mode, we’ll disable some services via the Registry
Click the “Start” menu icon
Type “regedit” into the search bar and hit Enter
For each of the following registry locations, you’ll need to browse to the key, find the “Start” value, and change it to 4

Computer\HKEY_LOCAL_MACHINE\SYSTEM\CurrentControlSet\Services\SenseComputer\HKEY_LOCAL_MACHINE\SYSTEM\CurrentControlSet\Services\WdBootComputer\HKEY_LOCAL_MACHINE\SYSTEM\CurrentControlSet\Services\WinDefendComputer\HKEY_LOCAL_MACHINE\SYSTEM\CurrentControlSet\Services\WdNisDrvComputer\HKEY_LOCAL_MACHINE\SYSTEM\CurrentControlSet\Services\WdNisSvcComputer\HKEY_LOCAL_MACHINE\SYSTEM\CurrentControlSet\Services\WdFilter
Leave Safe Mode the same way we got into it
Click the “Start” menu icon
type “msconfig” into the search bar within the Start Menu
Go to “Boot” tab and select “Boot Options”
Uncheck the box for “Safe boot”
Click Apply and OK
System will restart into normal desktop environment, now (hopefully) Defender-free.

Prevent the VM from going into standby
From an administrative command prompt, let’s prevent the VM from going into sleep/standby mode during our shenanigans
powercfg /change standby-timeout-ac 0
powercfg /change standby-timeout-dc 0
powercfg /change monitor-timeout-ac 0
powercfg /change monitor-timeout-dc 0
powercfg /change hibernate-timeout-ac 0
powercfg /change hibernate-timeout-dc 0
Install Sysmon in Windows VM
This is mostly optional as we don’t directly use Sysmon in this guide, but it’s a must-have analyst tool for getting very granular telemetry on your Windows endpoint of all sorts of interesting activity — so I recommend it for familiarity reasons alone.
Launch an Administrative PowerShell console for the following commands
Click the “Start” menu icon
Type “powershell” into the search bar within the Start Menu
Right+Click “Windows PowerShell” and click “Run as administrator”
Download Sysmon with the following command. Read more about Sysmon here.
Invoke-WebRequest -Uri https://download.sysinternals.com/files/Sysmon.zip -OutFile C:\Windows\Temp\Sysmon.zipUnzip Sysmon.zip
Expand-Archive -LiteralPath C:\Windows\Temp\Sysmon.zip -DestinationPath C:\Windows\Temp\SysmonDownload SwiftOnSecurity’s Sysmon config.
Invoke-WebRequest -Uri https://raw.githubusercontent.com/SwiftOnSecurity/sysmon-config/master/sysmonconfig-export.xml -OutFile C:\Windows\Temp\Sysmon\sysmonconfig.xmlInstall Sysmon with Swift’s config
C:\Windows\Temp\Sysmon\Sysmon64.exe -accepteula -i C:\Windows\Temp\Sysmon\sysmonconfig.xml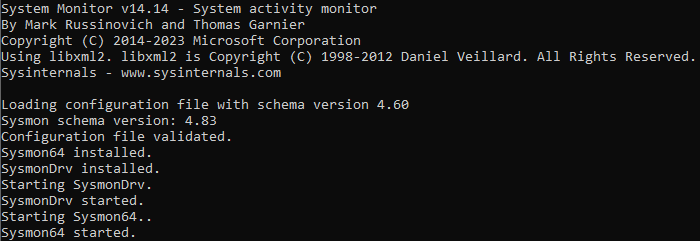
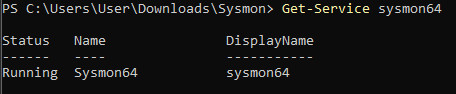
Validate Sysmon64 service is installed and running
Get-Service sysmon64
Check for the presence of Sysmon Event Logs
Get-WinEvent -LogName "Microsoft-Windows-Sysmon/Operational" -MaxEvents 10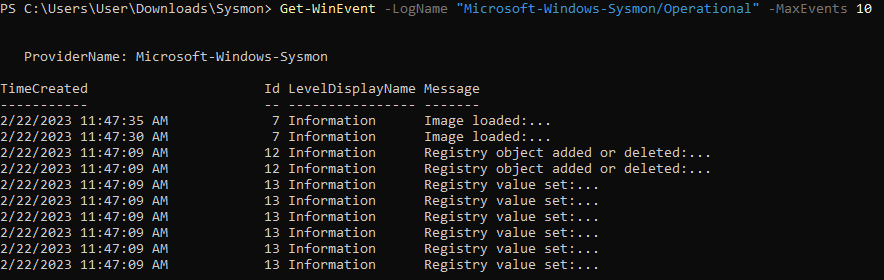


Install LimaCharlie EDR on Windows VM
LimaCharlie is a very powerful “SecOps Cloud Platform”. It not only comes with a cross-platform EDR agent, but also handles all of the log shipping/ingestion and has a threat detection engine. I am a huge fan of LimaCharlie for many reasons, one of which is that they have a free tier for up to two systems which is what allows me to make it an instrumental part of this guide.
Create a free LimaCharlie account.
LimaCharlie will ask you a few questions about your role. Answer however you wish, it just helps their developers build a better product. If you’d like for them to know that this series helped you discover LC, reference this blog post under “How did you hear about us?” Completely optional, I do not get kickbacks or anything :)
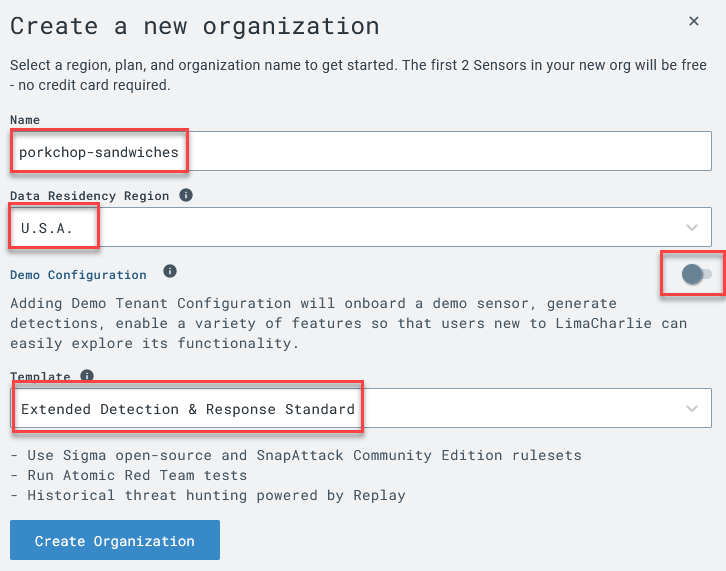
Once logged into LimaCharlie, create an organization
Name:
whatever you want, but it must be uniqueData Residency:
whatever is closestDemo Configuration Enabled:
disabledTemplate:
Extended Detection & Response Standard
Once the org is created, click “Add Sensor”

Select Windows
Provide a description such as:
Windows VM - LabClick Create
Select the Installation Key we just created

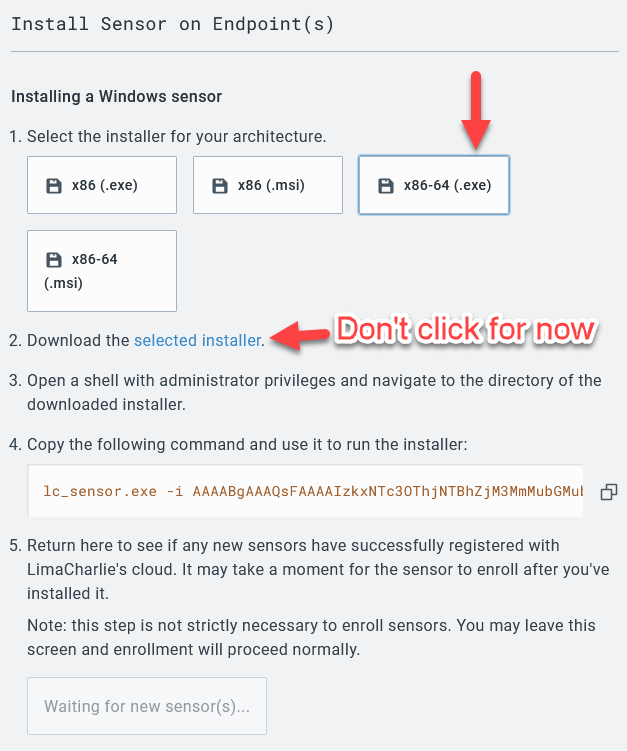
Specify the x86-64 (.exe) sensor, but then skip ahead to my instructions versus the ones provided.

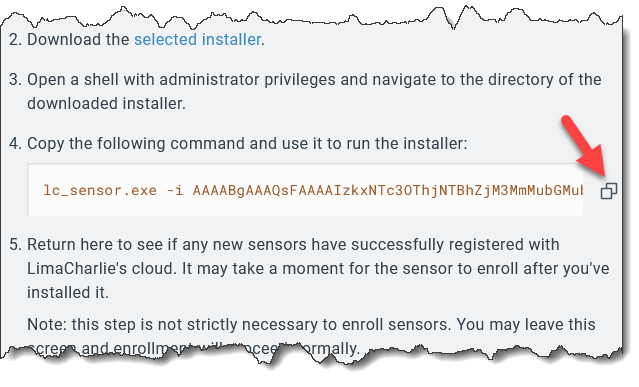
IN THE WINDOWS VM, open an Administrative PowerShell prompt and paste the following commands:
cd C:\Users\User\DownloadsInvoke-WebRequest -Uri https://downloads.limacharlie.io/sensor/windows/64 -Outfile C:\Users\User\Downloads\lc_sensor.exeShift into a standard command prompt by running this command
cmd.exeNext, we will copy the install command provided by LimaCharlie which contains the installation key. Paste this command into your open terminal.

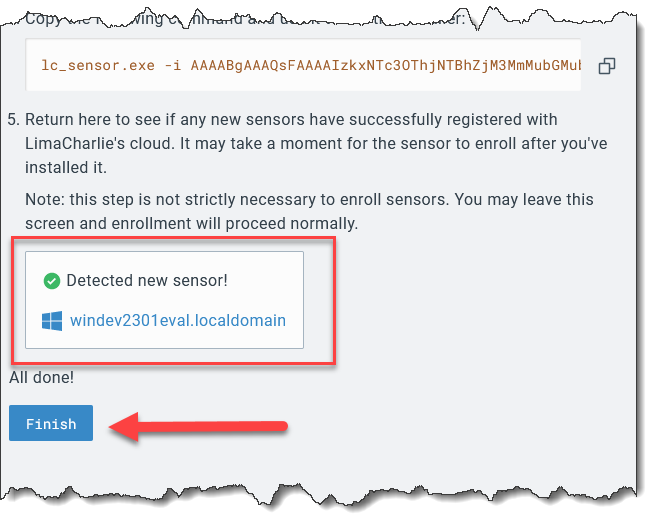
Paste this command into the admin command prompt in your Windows VM This is the expected output, ignore the “ERROR” that says “service installed!” Still waiting on those guys to fix that :)

If you experience an error trying to install the EXE, try the x86-64 MSI option on the LimaCharlie installer dialog.
If everything worked correctly, in the LimaCharlie web UI you should also see the sensor reporting in.
Now let’s configure LimaCharlie to also ship the Sysmon event logs alongside its own EDR telemetry
In the left-side menu, click “Artifact Collection”
Next to “Artifact Collection Rules” click “Add Rule”
Name:
windows-sysmon-logsPlatforms:
WindowsPath Pattern:
wel://Microsoft-Windows-Sysmon/Operational:*Retention Period:
10Click “Save Rule”
LimaCharlie will now start shipping Sysmon logs which provide a wealth of EDR-like telemetry, some of which is redundant to LC’s own telemetry, but Sysmon is still a very power visibility tool that runs well alongside any EDR agent.
The other reason we are ingesting Sysmon logs is that the built-in Sigma rules we previously enabled largely depend on Sysmon logs as that is what most of them were written for.
That’s all we’ll do with LimaCharlie for now. We’ll dive deeper into what it can do later on. Feel free to close all open windows on the Windows VM as we’re now moving onto the Linux VM.
Pro Tip: Now would be a good time to Snapshot your Windows VM in case it gets hosed later on. You can always revert to this “Clean” snapshot later on to get back to a good state.


Setup Attack System
We’ll perform these steps from your host system, by using SSH to access the Linux VM.
I highly recommend using an SSH client to access the Ubuntu VM so that you can easily copy/paste commands. MacOS/Linux/Modern Windows systems have builtin SSH abilities, but there are third party tools for this as well.
Using the statically assigned IP address we copied down in the Linux VM installation process, let’s SSH onto the VM from your host system to make future CLI activities easier thanks to copy/paste magic.
I’ll let you decide which SSH client to use, but from a modern Mac/Linux/Windows system, simply open a command prompt and run
ssh user@[Linux_VM_IP]
Now, from within this new SSH session, proceed with the following instructions to setup our attacker C2 server. First, let’s drop into a root shell to make life easier.
sudo suRun the following commands to download Sliver, a Command & Control (C2) framework by BishopFox. I recommend copy/pasting the entire block as there is line-wrapping occurring.
# Download Sliver Linux server binary
wget https://github.com/BishopFox/sliver/releases/download/v1.5.34/sliver-server_linux -O /usr/local/bin/sliver-server
# Make it executable
chmod +x /usr/local/bin/sliver-server
# install mingw-w64 for additional capabilities
apt install -y mingw-w64
Now let’s create a working directory we’ll use in future steps
# Create our future working directory
mkdir -p /opt/sliver
If everything above worked as expected, you are good to go. In the next post of this series, we’ll explore dropping a C2 payload onto our Windows VM which opens the door for all sorts of fun detection activities that we’ll look for with Sysmon and LimaCharlie.
Before beginning the next post of the series, I highly recommend exploring the LimaCharlie web interface to learn more about what it can do. Specifically, go to the “Sensors List”, click on the hostname of the sensor we installed today, and explore these menu options to start with:
Timeline (this feature alone saved you an extra 2-3 hours of setting up other VMs!)
Processes
Real-time list of process activity
Network
Real-time list of active network connections and listening ports
File System
Browse the entire file system!
In the next post we’ll dive deeper into LimaCharlie, blow some stuff up on the Windows VM, explore the telemetry generated, and write some detection rules!
Great tutorial, Eric.
Learned a lot this weekend.
I noticed that LimaCharlie apparently changed the lc_sensor.exe to hcp_win_x64_release_4.28.0.exe
Then added the information with -i
Awesome lab + write up, thanks!