


So you want to be a SOC Analyst? Part 6
Let's get a little more advanced with our detection rules by leveraging automated YARA scanning.

If you just landed here, be sure to check out the Intro to this series for backstory.
You will need to complete the following posts in this series before beginning this one:
Automated Yara Scanning
The goal of this post is to take advantage of a more advanced capability of any good EDR sensor, to automatically scan files or processes for the presence of malware based on a YARA signature.
What is YARA?
YARA is a tool primarily used for identifying and classifying malware based on textual or binary patterns. It allows researchers and security professionals to craft rules that describe unique characteristics of specific malware families or malicious behaviors. These rules can then be applied to files, processes, or even network traffic to detect potential threats. When analyzing a compromised system, YARA helps in sifting through large amounts of data to find malicious artifacts by matching them against a set of predefined rules. This ability to create customized detection signatures is particularly useful in threat hunting and incident response, enabling swift identification of known and even previously unknown malicious elements.
YARA originated from the efforts of Victor M. Alvarez, a malware researcher. It was initially developed as an internal tool at his former employer, Hispasec Sistemas, which is behind the well-known VirusTotal service. The tool was designed to assist researchers in identifying and classifying malware samples based on textual or binary patterns. Due to its effectiveness and utility, YARA was later released as an open-source tool, and it quickly gained popularity in the cybersecurity community. Over the years, it has become a standard tool for malware research, threat hunting, and incident response, thanks to its flexibility and the active community that has grown around it.
There are many free and open source YARA scanners and rulesets. Read more about YARA from VirusTotal or explore one of the many open source YARA rulesets. A solid premium ruleset is the one maintained by Nextron systems.
Let’s put it to work!
We are going to prepare our LimaCharlie instance for detecting certain file system and process activities in order to trigger YARA scans.
Add a YARA signature for the Sliver C2 payload
Since we already know we’re dealing with the Sliver C2 payload, we can be more targeted in our exercise by using a signature specifically looking for Sliver. Lucky for us, the UK National Cyber Security Centre published some fantastic intel on Sliver, including YARA signatures and other useful detections. The only downside is they crammed it all into a PDF making it a little difficult to use without extracting it manually — which I’ve already done for you.
Within LimaCharlie, browse to “Automation” > “YARA Rules”

NOTE: If you have “YARA Service” in your menu instead of “YARA Rules”, you need to make the migration from the YARA Service to the new YARA Extension.


NOTE: If you encounter a permission error on this page, no worries — easy fix.
On the left side menu, click “Access Management” > “Users & Roles
Click your username (likely your email address)
Toggle “ON” the “Select All” at the top right of the permissions list to give yourself all permissions
Scroll down and click “Update Permissions & Close”
Proceed back to “Automations” > “Yara Rules” and continue to the next step.
Under “Automation” > “YARA Rules”, Click
Add Yara Rule
Name the rule
sliverCopy and paste the contents of this gist into the Rule block

Click “Save Rule”
Now create one more YARA rule that we’ll use later on for a more specific purpose. I’ll explain this later on in the post.
Name the rule
sliver-processCopy and paste the contents of this gist into the Rule block.
Now, before we use these YARA rules, we want to setup a few generic D&R rules that will generate alerts whenever a YARA detection occurs.
Browse to “Automation” > “D&R Rules”
Create a new rule
In the Detect block, paste the following
event: YARA_DETECTION
op: and
rules:
  - not: true
    op: exists
    path: event/PROCESS/*
  - op: exists
    path: event/RULE_NAME
Notice that we’re detecting on YARA detections not involving a PROCESS object, that’ll be its own rule shortly.
In the Respond block, paste the following
- action: report
  name: YARA Detection {{ .event.RULE_NAME }}
- action: add tag
  tag: yara_detection
  ttl: 80000
Save the rule and title it
YARA Detection
Create another rule
In the Detect block, paste the following
event: YARA_DETECTION
op: and
rules:
  - op: exists
    path: event/RULE_NAME
  - op: exists
    path: event/PROCESS/*
Notice that this detection is looking for YARA Detections specifically involving a PROCESS object.
In the Respond block, paste the following
- action: report
  name: YARA Detection in Memory {{ .event.RULE_NAME }}
- action: add tag
  tag: yara_detection_memory
  ttl: 80000
Save the rule and title it
YARA Detection in Memory


Let’s test our new YARA signature
Since we already know we have a Sliver implant sitting in the Downloads folder of our Windows VM, we can easily test our signature by initiating a manual YARA scan using the EDR sensor. This will give us a sanity check that all things are working up to this point.
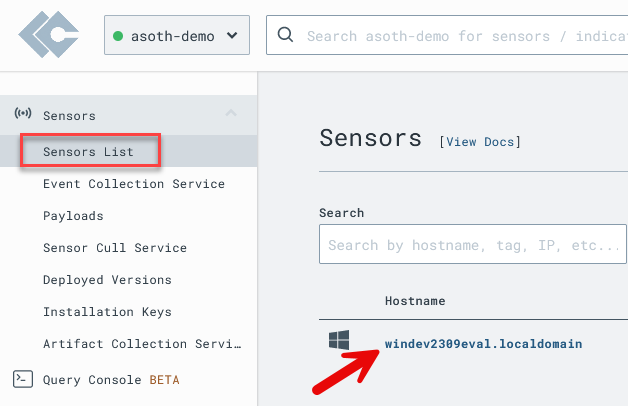
In LimaCharlie, browse to the “Sensors List” and click on our Windows VM sensor
Access the EDR Sensor Console which allows us to run sensor commands against this endpoint

Run the following command to kick off a manual YARA scan of our Sliver payload. You will need to know the name of your Sliver executable created in Part 2 - Step 3.
Replace
[payload_name]with your actual payload name
yara_scan hive://yara/sliver -f C:\Users\User\Downloads\[payload_name].exe
Hit enter twice to execute this command
Ideally, your output looks similar to mine below, indicating a positive hit on one of the signatures contained within the Sliver YARA rule

Now, also confirm that you have a new Detection on the “Detections” screen

If you’re with me so far, we’re ready to automate this process!


Automatically YARA scan downloaded EXEs
Browse to “Automation” > “D&R Rules”
Create a new rule
In the Detect block, paste the following
event: NEW_DOCUMENT
op: and
rules:
  - op: starts with
    path: event/FILE_PATH
    value: C:\Users\
  - op: contains
    path: event/FILE_PATH
    value: \Downloads\
  - op: ends with
    path: event/FILE_PATH
    value: .exe
Notice that this detection is simply looking for NEW
.exefiles to appear in any users Downloads directory.
In the Respond block, paste the following
- action: report
  name: EXE dropped in Downloads directory
- action: task
  command: >-
    yara_scan hive://yara/sliver -f "{{ .event.FILE_PATH
    }}"
  investigation: Yara Scan Exe
  suppression:
    is_global: false
    keys:
      - '{{ .event.FILE_PATH }}'
      - Yara Scan Exe
    max_count: 1
    period: 1m
This response action generates an alert for the EXE creation, but more importantly, kicks off a YARA scan using the Sliver signature against the newly created EXE.
Save the rule and title it
YARA Scan Downloaded EXE
Automatically YARA scan processes launched from Downloads directory
Browse to “Automation” > “D&R Rules”
Create a new rule
In the Detect block, paste the following
event: NEW_PROCESS
op: and
rules:
  - op: starts with
    path: event/FILE_PATH
    value: C:\Users\
  - op: contains
    path: event/FILE_PATH
    value: \Downloads\
This rule is matching any process that is launched from a user Downloads directory
In the Respond block, paste the following
- action: report
  name: Execution from Downloads directory
- action: task
  command: yara_scan hive://yara/sliver-process --pid "{{ .event.PROCESS_ID }}"
  investigation: Yara Scan Process
  suppression:
    is_global: false
    keys:
      - '{{ .event.PROCESS_ID }}'
      - Yara Scan Process
    max_count: 1
    period: 1m
Notice in this rule, we’re no longer scanning the
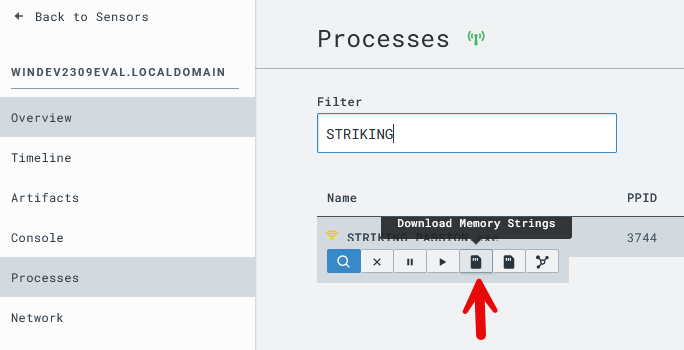
FILE_PATH, but the actual running process by specifying itsPROCESS_ID.We are also now using the other YARA rule we created,sliver-processIf you’re curious why we’ve switched YARA rules here, it’s due to the fact that in my testing, I realized that the NCSC rules do not fire on running versions of Sliver due to the specific logic they’ve used in the match condition. So I loosened up that logic to detect strings I know should be present in a running Sliver beacon, and I verified this by using LimaCharlie to pull strings from my Sliver process.
See my method in the screenshots below


Save the rule and title it:
YARA Scan Process Launched from Downloads


Let’s trigger our new rules!
Scanning New EXEs in Downloads
To make things easier, we won’t re-download our Sliver payload, but we’ll simulate this activity by moving it to another location, then putting it back into C:\Users\User\Downloads
Run the following PowerShell command to move your Sliver payload from Downloads to Documents
Replace
[payload_name]with your actual payload nameMove-Item -Path C:\Users\User\Downloads\[payload_name].exe -Destination C:\Users\User\Documents\[payload_name].exe
Now, put it back to generate the NEW_DOCUMENT event for an EXE being dropped into the Downloads folder
Replace
[payload_name]with your actual payload nameMove-Item -Path C:\Users\User\Documents\[payload_name].exe -Destination C:\Users\User\Downloads\[payload_name].exe
Head over to your Detections tab and see what happened!
It may take a moment or so, maybe a refresh, to see the new detections

We should see an initial alert for EXE dropped in Downloads directory followed shortly by a YARA detection once the scan kicked off and found Sliver inside the EXE
If you do not see these detections, pop into the Timeline of your system and search for the payload name and make sure you have
NEW_DOCUMENTevents showing the move from Documents → Downloads

Scanning processes launched from Downloads
Now let’s test our NEW_PROCESS rule to scan running processes launched from Downloads
Launch an Administrative PowerShell prompt
First, let’s kill any existing instances of our Sliver C2 from previous labs
Replace
[payload_name]with your actual payload name WITHOUT.exe- for instance, if your payload name isSTRIKING_PASSION.exe, just useSTRIKING_PASSIONin this commandGet-Process [payload_name] | Stop-Process
If you get an error, either you didn’t have one running (which is fine), or you messed up the
[payload_name]part.
Execute your Sliver payload to create the NEW_PROCESS event we need to trigger the scanning of a process launched from the Downloads directory
C:\Users\User\Downloads\[payload_name].exe
Head over to your Detections tab and see what happened!

We should see an initial alert for
Execution from Downloads directoryfollowed shortly by aYARA detection in Memoryonce the scan kicked off and found Sliver inside the EXE
Crushed it :)


Now what?
Just imagine all the possibilities unlocked by this capability…
Scan new files in web server wwwroot directories for webshells
Scan suspicious rundll32 processes for CobaltStrike
Automatically terminate processes or delete files matching a YARA detection🔥
The only limit is your imagination :)
Now, go find evil.

Hi, im stuck with the same problem, did u figured it out?
Hi Eric,
Is there a way I can connect Splunk to this and if so how can I do it and analyse the log events? As in how can I add the gathered data into Splunk?
Sorry, forgot to mention, not specifically for this part, but for the overall lab.